Report Management is an effective tool for assigning default printers and paper sources to Enterprise reports.
Each Enterprise report can be assigned its own preferred printer and paper source, allowing for one-click printing for specialty reports such as labels or reports on colored paper. A Print Dialog prompt can also be assigned to the report, which will require the user generating the report to choose which printer to use.
Assigning a printer to a report:
- From Report Management, collapse all divisions except the one you intend to edit by clicking the “-“ button beside each division’s “Category – Enterprise” list.
- For the division you wish to edit, make sure to expand the “Category – Enterprise” list with the “+” button, then find the report type you wish to edit and left-click. This will open all Reports associated with the type.
- From here, you can assign your print preferences for this report:
- Assign the preferred printer and paper source using the “Printer/PaperSource” dropdown menu. If the desired printer or paper source are not available, follow the “Adding a new printer” instructions below.
- Checking the “Print Dialog Visible” box will force the user printing the report to choose which printer they want to use every time the report is generated. Unchecking this box will allow one-click printing to the selected printer and paper source.
- Once the printer is defined, click “Save” to retain the changes.
Adding a new printer:
- From Report Management, ensure all divisions are collapsed by clicking the “-“ buttons beside each division’s “Category – Enterprise” list.
- Choose the “Printers” option below the Division you wish to edit. In this screenshot, I am editing the printers for Division 005:
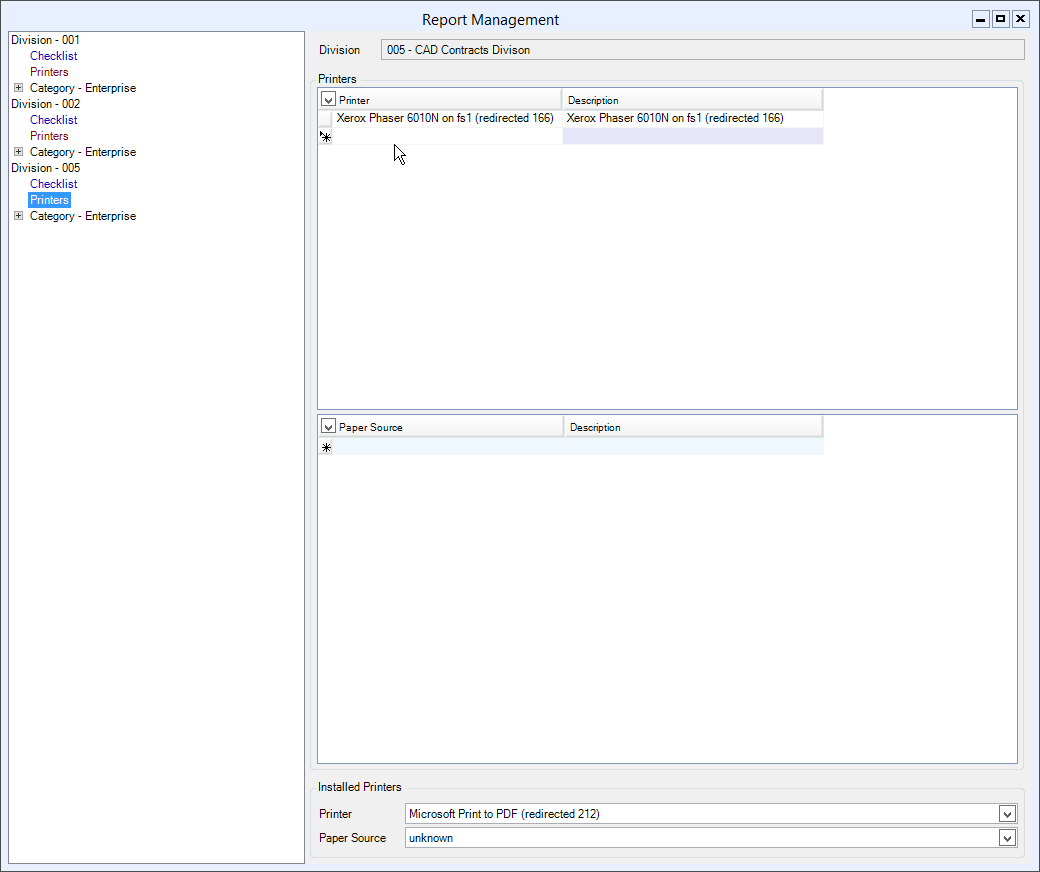
- Right-click inside the upper “Printers” pane and select “Add Printer.” Alternatively, you can left-click into the field marked by the asterisk.
- For Report Management to find the exact printer required – whether network or local – the Printer name must be entered exactly as your system recognizes it. This name can be easily found in the “Installed Printers” dropdown menu in the lower part of the window.
To copy the exact name, choose the desired printer from the dropdown menu and press Ctrl+C to copy the entire selected field. Then, click into the new field created in the upper Printers pane and press Ctrl+V to paste the exact name into both the Printer and Description fields.
If the desired printer is not found in the dropdown window, please consult your IT administrator.
- Once the printer is entered in the upper pane, choose your preferred paper source following the same process as used to add the printer:
- Under “Installed Printers,” choose the preferred source in the dropdown menu at the bottom of the window;
- Ctrl+C once the source is selected;
- Inside the “Paper Source” pane, create a new source via right-clicking and choosing “Add Paper Source” or left-click into the field beside the asterisk;
- Press Ctrl+V to add the source to both the Paper Source and Description fields. This process can be used to create as many paper sources per printer as required or available – simply choose another source in the “Installed Printers” Paper Source dropdown, CTRL+C, and enter the source’s name in a new line in the Paper Source pane.
Comments
Please sign in to leave a comment.